Tuesday, July 31, 2012

File transfer through Windows Remote Desktop client

I can't believe I have never known about this feature of the Windows Remote Desktop client. I have been using Windows since version 3.1 and I use the Remote Desktop client (RDP) almost everyday at work. I have done an informal poll of several people I work with and none of them knew about this either. The feature I am talking about is mapping local drives to a remote machine using only the Remote Desktop client. I only ran across this myself while doing some reading about managing Amazon EC2 instances. I'm not sure why this feature is buried so deep in the options. Anyway here is how to use it:


Launch Remote Desktop and click on the 'Local Resources' tab.

I have used the Local Resources tab many times to change printer and audio settings. That 'More...' button hides some neat features. Click on 'More...' 

After clicking 'More...' you will have a list of all the drives available on your local PC. Check the box next to the drives you want to have mapped to the remote system.

After you have made the Remote Desktop connection to the remote machine this is how the drive appears on the remote system. There is an 'Other' section in the list of drives. Now you can to copy files back and forth to the remote system directly through the Remote Desktop client connection!

Wednesday, July 11, 2012

NetApp deduplication for VMware

Being a skeptic I usually don't believe something until I see some hard evidence. When I am dealing with claims made by a company trying to sell me something I don't believe anything until I see results with my own two eyes. At work we recently began upgrading from a NetApp FAS270C to a FAS2240-2. We needed to upgrade to a faster filer anyway so deduplication wasn't the only selling point but it definitely was of interest to me. We are planning on migrating our VMware virtual machine disks from local storage on our various ESXi servers to centralized storage on the NetApp over NFS mounts. NetApp deduplication has been around for a while now and NetApp recommends enabling dedup for all VMware volumes. My NetApp sales rep also told me that tons of his other customers were using NFS mounts along with dedup and seeing disk space savings of 20-50%. Based on all of that info and finally having the budget to purchase a new filer I decided it was time to try dedup out in my environment.

I began testing a few weeks ago by creating a few test VM's on the NFS mounted volume and after that went well I moved on to migrating a few existing non-critical VM's to the NFS mount. The performance over NFS was quite good and after letting things run for about a week I did not see anything obviously wonky with the virtual machines so I decided to enable deduplication or "Storage Efficiency" as NetApp calls it. One thing to note is that the deduplication only works for data added after it has been enabled. So if you have an existing volume that is already filled with data you won't see much benefit unless you tell the NetApp to scan all the data on volume.

HOW TO

So let's start with the command to manage dedup on a NetApp. The command is named 'sis'. Running sis with no options will give you the list of available options
netapp2240-1> sis
The following commands are available; for more information
type "sis help "
config              off                 revert_to           status
help                on                  start               stop

The sis status command will show you if dedup is enabled.
netapp2240-1> sis status          
Path                           State      Status     Progress
/vol/testvol                   Disabled   Idle       Idle for 02:12:30
/vol/vol_prod_data             Enabled    Active     70 GB Scanned

The sis on /vol/volname command will enable dedup on a volume.
netapp2240-1> sis on /vol/testvol
SIS for "/vol/testvol" is enabled.
Already existing data could be processed by running "sis start -s /vol/testvol".
Notice that helpful message about processing already existing data? The default schedule once dedup is enabled is to run the process one a day at midnight. You can kick off the process manually with the sis start /vol/volname command. The start command has a '-s' option which will cause the dedup scan to process all of the existing data looking for duplication.
netapp2240-1> sis start -s /vol/testvol
The file system will be scanned to process existing data in /vol/testvol.
This operation may initialize related existing metafiles.
Are you sure you want to proceed (y/n)? y
The SIS operation for "/vol/testvol" is started.
netapp2240-1> Wed Jul 11 14:10:06 CDT [aus-netapp2240-1:wafl.scan.start:info]: Starting SIS volume scan on volume testvol.
You can use the sis status command to monitor the progress of the deduplication process.
netapp2240-1> sis status
Path                           State      Status     Progress
/vol/testvol                   Enabled    Active     4 KB (100%) Done

RESULTS

For my volume that is storing VMware virtual machine disks I am seeing an unbelievable 59% savings of disk space. It's pretty crazy. I keep adding virtual machine disks to the volume and the used space hardly grows at all. So far all of the virtual machines I have put on this volume are Linux. I expect once I start adding some Windows VM's the savings will go down somewhat.


To highlight the importance of using the '-s' option to process all existing data I have this example from a volume that is used as a file share for user data. We enabled dedup and after several nightly dedup runs we were disappointed to see almost no savings.
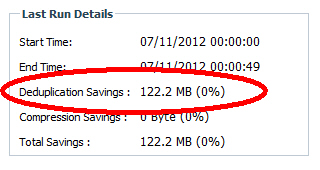
Dedup enabled but without initially using the '-s' option.
I knew something wasn't right. I had a hunch that the users had more than 122MB of duplicate files out of 450GB of data. In doing research for this blog post I discovered the '-s' option. We kicked off a manual dedup process with the -s and check out the results.
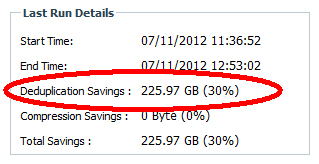
After reprocessing with '-s'.
We freed up 225GB of disk space with one simple command (and the command wasn't rm * ;-).

I recommend enabling deduplication on any file share volumes or VMware volumes. You will probably see more savings with the VMware volumes because multiple copies of operating systems will have lots of duplicate files. So far I have seen between 15-30% savings for file share volumes and up to 59% savings for VMware volumes.

Friday, July 6, 2012

pyMCU and DS18B20 temperature sensors

As part of my Garage Monitor project I am using a Maxim DS18B20 digital temperature sensor with a pyMCU microcontroller. I found lots of pages and sample code for using the DS18B20 with Arduino boards and various other microcontrollers but nothing for the pyMCU. The pyMCU uses a Python library published by the board manufacturer to control it. The DS18B20 uses the 1-Wire communication bus and the pyMCU Python library includes functions for 1-Wire communication called owWrite and owRead. The tricky part is figuring out the command sequence to coax a temperature reading out of the sensor. The communication with the sensor involves writing several hex values to it and then reading a hex temperature value. That hex value is then converted to a decimal value.

It took me the better part of three evenings to figure out the sequence of writes and reads. The other thing that was a bit difficult was figuring when to send reset pulses.

The pyMCU 1-Wire function uses this format:

owWrite(pinNum, mode, writeData)

The mode value determines if a reset pulse is sent before or after the data. Here is how I wired it:


And is the code that I wrote:

#!/usr/bin/python
#
# Written by Matthew McMillan
# matthew.mcmillan at gmail dot com
#
# This code reads a temperature value from
# a DS18B20 sensor using a pyMCU board. It only
# reads from a single sensor.
#
import pymcu           # Import the pymcu module

# Function to read value from DS18B20 temperature sensor
# Need to pass digital pin number and flag for F or C units
#
# 0x33  READ ROM. Read single device address.
# 0xCC  SKIP ROM. Address all devices on the bus
# 0x44  CONVERT T. Initiate temperature conversion
# 0xBE  READ SCRATCHPAD. Initiate read temp stored in the scratchpad.

def readtemp(pin,ForC):
    mb.owWrite(pin,1,0x33)
    ReadVal = mb.owRead(pin,0,8)
    mb.owWrite(pin,1,0xCC)
    mb.owWrite(pin,0,0x44)
    mb.owWrite(pin,1,0xCC)
    mb.owWrite(pin,0,0xBE)
    ReadVal = mb.owRead(pin,0,12)
    HexVal1 = hex(ReadVal[1])
    HexVal2 = hex(ReadVal[0])
    HexVal1 = HexVal1[2:4]
    HexVal2 = HexVal2[2:4]
    HexVal = '0x'+HexVal1+HexVal2
    DecVal = int(HexVal, 0)
    TempC = (DecVal * 0.0625)
    if ForC:
        TempF = ((TempC*9)/5)+32
        TempFR = round(TempF, 1)
        return TempFR
    else:
        TempCR = round(TempC, 1)
        return TempCR

################
# Main program
################

# Initialize mb (My Board) with mcuModule Class Object
mb = pymcu.mcuModule() 

#  Need to pass digital pin number and flag for ForC
tempout = readtemp(7,1)

print 'Temp: ' + str(tempout)


Please leave a comment if you found this helpful. I found this page on hackaday.com very helpful in figuring this out.

Sunday, July 1, 2012

Raspberry Pi Heat Sinks

A friend of mine noticed that his Raspberry Pi got quite warm while playing 1080p video.  I am planning on using my Raspberry Pi in the garage which gets pretty dang hot here in Texas so we were both interested in adding additional cooling to the Pi. He found a post talking about making custom heat sinks out of old CPU heat sinks. One of the commenters on that post suggested using Zalman VGA Ram Heatsinks. Fry's Electronics has the silver colored version of these heat sinks for only $4.99. They come in a pack of eight and you only need three for each Raspberry Pi. 

The Raspberry Pi CPU (or SoC to be completely accurate) is 12mm x 12mm and so are the Zalman VGA Ram Heatsinks. So the CPU is easy enough to add a heat sink. You can just peel off the backing of the thermal tape and stick it on the CPU. There are two other components that would benefit from cooling as well. One is the USB/Ethernet controller and the other is the voltage regulator. For these two chips I had to cut down the heat sinks so they would fit without touching other components on the board. I used my Dremel tool with a cutoff wheel to trim them down to size and then a sanding drum to clean up the edges. The thermal tape that was on the heat sinks got pretty messed up during the cutting but the pack of eight came with two extra pieces of thermal tape so I trimmed down those extra pieces. You could also use thermal compound to stick them on if you have some of that.

Location of the various chips that may need cooling.

I just eye balled the closest fins that would fit the chip and marked it
 with an ultra fine point Sharpie marker.

After cutting the heat sinks with my Dremel tool.

Heat sinks installed on my Raspberry Pi.