Showing posts with label NetApp. Show all posts

Wednesday, July 11, 2012

NetApp deduplication for VMware

Being a skeptic I usually don't believe something until I see some hard evidence. When I am dealing with claims made by a company trying to sell me something I don't believe anything until I see results with my own two eyes. At work we recently began upgrading from a NetApp FAS270C to a FAS2240-2. We needed to upgrade to a faster filer anyway so deduplication wasn't the only selling point but it definitely was of interest to me. We are planning on migrating our VMware virtual machine disks from local storage on our various ESXi servers to centralized storage on the NetApp over NFS mounts. NetApp deduplication has been around for a while now and NetApp recommends enabling dedup for all VMware volumes. My NetApp sales rep also told me that tons of his other customers were using NFS mounts along with dedup and seeing disk space savings of 20-50%. Based on all of that info and finally having the budget to purchase a new filer I decided it was time to try dedup out in my environment.

I began testing a few weeks ago by creating a few test VM's on the NFS mounted volume and after that went well I moved on to migrating a few existing non-critical VM's to the NFS mount. The performance over NFS was quite good and after letting things run for about a week I did not see anything obviously wonky with the virtual machines so I decided to enable deduplication or "Storage Efficiency" as NetApp calls it. One thing to note is that the deduplication only works for data added after it has been enabled. So if you have an existing volume that is already filled with data you won't see much benefit unless you tell the NetApp to scan all the data on volume.

HOW TO

So let's start with the command to manage dedup on a NetApp. The command is named 'sis'. Running sis with no options will give you the list of available options
netapp2240-1> sis
The following commands are available; for more information
type "sis help "
config              off                 revert_to           status
help                on                  start               stop

The sis status command will show you if dedup is enabled.
netapp2240-1> sis status          
Path                           State      Status     Progress
/vol/testvol                   Disabled   Idle       Idle for 02:12:30
/vol/vol_prod_data             Enabled    Active     70 GB Scanned

The sis on /vol/volname command will enable dedup on a volume.
netapp2240-1> sis on /vol/testvol
SIS for "/vol/testvol" is enabled.
Already existing data could be processed by running "sis start -s /vol/testvol".
Notice that helpful message about processing already existing data? The default schedule once dedup is enabled is to run the process one a day at midnight. You can kick off the process manually with the sis start /vol/volname command. The start command has a '-s' option which will cause the dedup scan to process all of the existing data looking for duplication.
netapp2240-1> sis start -s /vol/testvol
The file system will be scanned to process existing data in /vol/testvol.
This operation may initialize related existing metafiles.
Are you sure you want to proceed (y/n)? y
The SIS operation for "/vol/testvol" is started.
netapp2240-1> Wed Jul 11 14:10:06 CDT [aus-netapp2240-1:wafl.scan.start:info]: Starting SIS volume scan on volume testvol.
You can use the sis status command to monitor the progress of the deduplication process.
netapp2240-1> sis status
Path                           State      Status     Progress
/vol/testvol                   Enabled    Active     4 KB (100%) Done

RESULTS

For my volume that is storing VMware virtual machine disks I am seeing an unbelievable 59% savings of disk space. It's pretty crazy. I keep adding virtual machine disks to the volume and the used space hardly grows at all. So far all of the virtual machines I have put on this volume are Linux. I expect once I start adding some Windows VM's the savings will go down somewhat.


To highlight the importance of using the '-s' option to process all existing data I have this example from a volume that is used as a file share for user data. We enabled dedup and after several nightly dedup runs we were disappointed to see almost no savings.
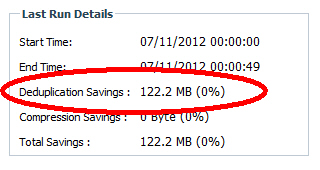
Dedup enabled but without initially using the '-s' option.
I knew something wasn't right. I had a hunch that the users had more than 122MB of duplicate files out of 450GB of data. In doing research for this blog post I discovered the '-s' option. We kicked off a manual dedup process with the -s and check out the results.

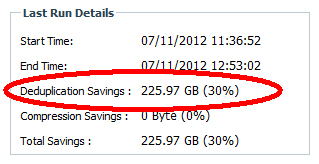
After reprocessing with '-s'.
We freed up 225GB of disk space with one simple command (and the command wasn't rm * ;-).

I recommend enabling deduplication on any file share volumes or VMware volumes. You will probably see more savings with the VMware volumes because multiple copies of operating systems will have lots of duplicate files. So far I have seen between 15-30% savings for file share volumes and up to 59% savings for VMware volumes.

Sunday, March 4, 2012

Troubleshooting a NetApp Snapmirror problem

Last night I started getting Nagios alerts that one of my Snapmirror replication sessions was falling way behind it's normal schedule. The source filer is a critical part of every web application we run and this failing Snapmirror session is critical to our disaster recovery plan.
I started by checking 'Filer At-A-Glance' on the source and destination filers and my MRTG charts. The CPU utilization was very high on the source filer and it was throwing syslog errors every minute saying "pipeline_3:notice]: snapmirror: Network communication error" and "SnapMirror source transfer from srcname to dstname: transfer failed." The CPU was at a 45% - 50% when it normally runs in the 3% - 8% range. The destination filer was throwing syslog errors about failed transfers and destination snapshots are in use and can't be deleted. For example "[snapmirror.dst.snapDelErr:error]: Snapshot dst-netapp(543534345435)_volname.12313 in destination volume volname is in use, cannot delete."

The high CPU was really worrying because come Monday morning I was picturing the additional load of web site traffic might cause the source NetApp to fall over dead. I let it run over night thinking the CPU load might be caused by a batch job, sort of hoping it would clear up by the morning and the Snapmirror would recover once the load dropped. Unfortunately I woke up to the exact same situation.

This morning I started with some triage. First task was get the CPU load down so we could at least function tomorrow. Since this all seemed related to Snapmirror I started by turning off Snapmirror all together on both filers. The command line to do this is 'snapmirror off'. VoilĂ , the CPU load on the source filer immediately dropped down to normal levels. Now worst case we could at function come Monday morning even if that meant not having the DR site up to date. I also disabled the Snapmirror schedule for this particular job which normally runs every fifteen minutes. With the schedule for the troublesome job disabled I turned Snapmirror back on (snapmirror on).

Next I wanted to test Snapmirror on a separate volume to see if Snapmirror was generally broken or if it was specific to that particular volume. To do this I created a new small (1GB) volume on both the source and destination filers. I copied a few hundred megs of data into it and then setup snapmirror for the volume. I hit Initialize and it worked just fine. Hmmm... ok so Snapmirror works. It must be a problem with that particular volume. 

From my CPU chart I had a pretty good idea of what time things went wrong. I was starting to consider the possibility that some strange combination of events took place at around 7pm which somehow interrupted/damaged the Snapmirror sync that took place at that time. Looking at the snapshots on both the source and destination filers I saw that I still had a couple hourly and one nightly snapshot in common between both filers before the CPU spike. So my next plan was to delete snapshots on the destination filer until I was at a spot prior to the CPU spike. I had to break the snapmirror relationship to make the destination filer read/write (snapmirror break volname). Then I deleted the snapshots that took place after and just prior to the CPU spike. Now replication on the destination filer was set back in time prior to the problem. I was desperately trying to avoid starting over with a full sync of 125GB of data! Fingers crossed I ran resync (on the destination filer!) to reestablish the snapmirror relationship:

dst-netapp> snapmirror resync dst-netapp:volname
The resync base snapshot will be: hourly.1
These older snapshots have already been deleted from the source and will be deleted from the destination:
    hourly.4
    hourly.5
    nightly.1
Are you sure you want to resync the volume? y
Sun Mar  4 11:43:26 CST [snapmirror.dst.resync.info:notice]: SnapMirror resync of volname to src-netapp:volname is using hourly.1 as the base snapshot.
Volume volname will be briefly unavailable before coming back online.
Sun Mar  4 11:43:28 CST [wafl.snaprestore.revert:notice]: Reverting volume vol1a to a previous snapshot.
Sun Mar  4 11:43:28 CST [wafl.vol.guarantee.replica:info]: Space for replica volume 'volname' is not guaranteed.
Revert to resync base snapshot was successful.
Sun Mar  4 11:43:28 CST [snapmirror.dst.resync.success:notice]: SnapMirror resync of volname to src-netapp:volname successful.
Transfer started.
Monitor progress with 'snapmirror status' or the snapmirror log.

Phew!! Success! CPU is at 3% and snapmirror is working again.

The error messages that the source filer was throwing were less than helpful. Network communication error? WTH? The problem had nothing to do with networking. Must be a general error message when a snapmirror transfer fails. The destination filer syslog messages gave me the best clue to the problem. One word of caution: Make sure you run the resync command on the correct filer! In this situation if I ran the resync command on the source filer it would have reverted it back to the previous afternoon losing all the data in between.